前言
哪吒监控 一个开源、轻量的服务器和网站监控、运维工具。本文记录部署过程。
本教程使用版本v0,最近作者升级了v1最新版。v1和v0无法兼容。
单点登录
github
配置地址: https://github.com/settings/developers
JihuLab
配置地址: https://jihulab.com/-/profile/applications
服务端安装
# 国外
curl -L https://raw.githubusercontent.com/naiba/nezha/master/script/install.sh  -o nezha.sh && chmod +x nezha.sh && sudo ./nezha.sh

# 国内
curl -L https://jihulab.com/nezha/nezha/-/raw/master/script/install.sh -o nezha.sh && chmod +x nezha.sh && sudo CN=true ./nezha.sh
服务端配置
配置接收数据地址
添加主机
nginx反向代理
server {
    listen 443 ssl http2;
    server_name mon.itbunan.xyz;
    server_tokens off;
    ssl_certificate /etc/nginx/cert/mon.itbunan.xyz_bundle.crt;
    ssl_certificate_key /etc/nginx/cert/mon.itbunan.xyz.key;
    ssl_protocols TLSv1.2 TLSv1.3;
    add_header X-Content-Type-Options nosniff;
    add_header X-XSS-Protection "1; mode=block";
    add_header Strict-Transport-Security "max-age=63072000; includeSubdomains; preload";

    location /ws {
        proxy_redirect off;
        proxy_pass http://172.17.0.10:8008;
        proxy_set_header Host $host;
        proxy_set_header X-Real_IP $remote_addr;
        proxy_set_header X-Forwarded-For $remote_addr:$remote_port;
        proxy_http_version 1.1;
        proxy_set_header Upgrade $http_upgrade;
        proxy_set_header Connection upgrade;
    }

    location /terminal {
        proxy_redirect off;
        proxy_pass http://172.17.0.10:8008;
        proxy_set_header Host $host;
        proxy_set_header X-Real_IP $remote_addr;
        proxy_set_header X-Forwarded-For $remote_addr:$remote_port;
        proxy_http_version 1.1;
        proxy_set_header Upgrade $http_upgrade;
        proxy_set_header Connection upgrade;
    }
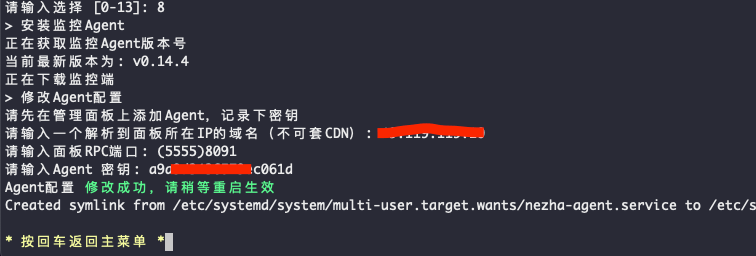
客户端安装
主流系统自动安装
# 国外
curl -L https://raw.githubusercontent.com/naiba/nezha/master/script/install.sh  -o nezha.sh && chmod +x nezha.sh && sudo ./nezha.sh

# 国内
curl -L https://jihulab.com/nezha/nezha/-/raw/master/script/install.sh -o nezha.sh && chmod +x nezha.sh && sudo CN=true ./nezha.sh
debain手动安装
## 安装依赖命令
apt install -y  wget  unzip curl

## 执行安装脚本
./agent_install.sh

## 启动
/opt/nezha/nezha-agent -s ip:5555  -p 密钥
#!/bin/bash
NZ_AGENT_PATH="/opt/nezha"
install() {
GITHUB_URL="github.com"
if [ ! -f "${NZ_AGENT_PATH}/nezha-agent" ]; then
if [[ $(uname -m | grep 'x86_64') != "" ]]; then
os_arch="amd64"
elif [[ $(uname -m | grep 'i386\|i686') != "" ]]; then
os_arch="386"
elif [[ $(uname -m | grep 'aarch64\|armv8b\|armv8l') != "" ]]; then
os_arch="arm64"
elif [[ $(uname -m | grep 'arm') != "" ]]; then
os_arch="arm"
elif [[ $(uname -m | grep 's390x') != "" ]]; then
os_arch="s390x"
elif [[ $(uname -m | grep 'riscv64') != "" ]]; then
os_arch="riscv64"
fi
local version=$(curl -m 10 -sL "https://api.github.com/repos/naiba/nezha/releases/latest" | grep "tag_name" | head -n 1 | awk -F ":" '{print $2}' | sed 's/\"//g;s/,//g;s/ //g')
if [ ! -n "$version" ]; then
version=$(curl -m 10 -sL "https://fastly.jsdelivr.net/gh/naiba/nezha/" | grep "option\.value" | awk -F "'" '{print $2}' | sed 's/naiba\/nezha@/v/g')
fi
if [ ! -n "$version" ]; then
version=$(curl -m 10 -sL "https://gcore.jsdelivr.net/gh/naiba/nezha/" | grep "option\.value" | awk -F "'" '{print $2}' | sed 's/naiba\/nezha@/v/g')
fi
if [ ! -n "$version" ]; then
echo -e "获取版本号失败,请检查本机能否链接 https://api.github.com/repos/naiba/nezha/releases/latest"
return 0
else
echo -e "当前最新版本为: ${version}"
fi
wget -t 2 -T 10 -O nezha-agent_linux_${os_arch}.zip https://${GITHUB_URL}/naiba/nezha/releases/download/${version}/nezha-agent_linux_${os_arch}.zip >/dev/null 2>&1
if [[ $? != 0 ]]; then
echo -e "Release 下载失败,请检查本机能否连接 ${GITHUB_URL}${plain}"
return 0
fi
mkdir -p $NZ_AGENT_PATH
chmod 755 -R $NZ_AGENT_PATH
unzip -qo nezha-agent_linux_${os_arch}.zip && mv nezha-agent $NZ_AGENT_PATH && rm -rf nezha-agent_linux_${os_arch}.zip
fi
if [ ! -x "${NZ_AGENT_PATH}/nezha-agent" ]; then
chmod +x ${NZ_AGENT_PATH}/nezha-agent
fi
}
export -f install
install访问
http://ip:8090



支持博主,一定多分享
终于找到这篇文章了,感谢作者的分享!