搜索到
17
篇与
的结果
-
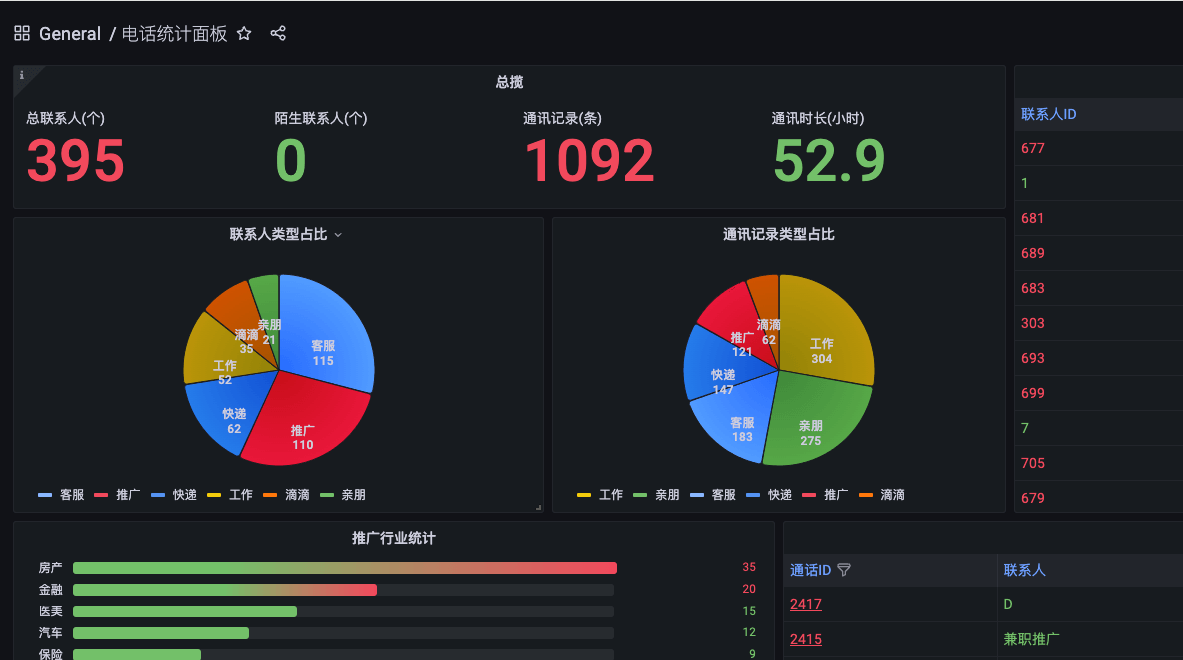
 基于Django的录音管理系统的开发总结 前言安卓手机默认打开了通话录音功能,几年下来积攒了上千条录音,一直懒得清理。最近写了一个管理系统,将所有录音文件导入。进行可视化分析,给自己几年打的所有电话生成一份报告。更直观的展示自己的通讯情况。{card-default label="统计" width="80%"}{/card-default}开发过程录音文件的管理通过django框架开发,主要功能点有通讯录管理、录音文件管理、录音文件转文字管理。转文字通过调用腾讯api完成,将结果保存到数据库,便于查询。可视化模块通过grafana直接读取mysql数据实现。模型类的设计模型类包括三种,Contact类、CallRecord类和RecordResult类。Contact类存储通讯录信息,包含名称和号码等class Contact(models.Model): number = models.CharField(max_length=15,verbose_name='电话号码') # 电话号码 name = models.CharField(blank=True,null=True,max_length=100,verbose_name='联系人') # 联系人姓名 # 新增的类型字段 TYPE_CHOICES = [ ('family', '亲朋'), ('work', '工作'), ('promotion', '推广'), ('taxi', '滴滴'), ('service', '客服'), ('delivery', '快递'), ] contact_type = models.CharField( max_length=10, choices=TYPE_CHOICES, verbose_name='类型', default='promotion', # 默认值为'亲朋' ) def __str__(self): return self.number class Meta: verbose_name = '通讯录' verbose_name_plural = '通讯录'CallRecord类用于存储音频文件、状态、音频转文字的任务信息等class CallRecord(models.Model): phone_number = models.ForeignKey(Contact, related_name='call_records', on_delete=models.CASCADE) # 电话号码外键 call_time = models.DateTimeField(verbose_name='时间') # 通话时间 recording_file = models.CharField(max_length=255, blank=True, null=True, verbose_name='文件名') # 录音文件名 notes = models.TextField(blank=True, null=True, verbose_name='备注') # 备注 task_id = models.CharField(max_length=255, blank=True, null=True, verbose_name='任务id') # 任务ID,可为空 # 状态字段的选择 STATUS_CHOICES = [ ('未处理', '未处理'), # Unprocessed ('处理中', '处理中'), # Processing ('已完成', '已完成'), # Completed ] status = models.CharField(max_length=10, choices=STATUS_CHOICES, default='未处理', verbose_name='状态') # 状态,默认值为 '未处理' def __str__(self): return f"{self.phone_number.number} - {self.call_time}" # 返回通话记录的字符串表示 class Meta: verbose_name = '通话录音' # 该模型的单数名称 verbose_name_plural = '通话录音' # 该模型的复数名称RecordResult用于管理存储音频转文字的结果等信息class RecordResult(models.Model): call_record = models.OneToOneField(CallRecord, related_name='record_result', on_delete=models.CASCADE) # 与 CallRecord 的一对一关系 # 录音时长,单位为秒 duration = models.PositiveIntegerField(verbose_name='时长') # 时长,正整数 # 错误信息,可以为空 error_message = models.TextField(blank=True, null=True, verbose_name='错误') # 错误信息,可为空值 # 文本结果,可以为空 text_result = models.TextField(blank=True, null=True, verbose_name='全文') # 文本结果,可为空 # 文本大纲,可以为空 text_outline = models.TextField(blank=True, null=True, verbose_name='大纲') # 文本大纲,可为空 # 标签,可以为空 tags = models.CharField(max_length=255, blank=True, null=True, verbose_name='标签') # 标签,最多 255 字符,可以为空 # 备注,可以为空 notes = models.TextField(blank=True, null=True, verbose_name='备注') # 备注,可为空 def __str__(self): return f"{self.call_record.phone_number.number} - {self.duration}" class Meta: verbose_name = '通话文本' # 模型的单数名称 verbose_name_plural = '通话文本' # 模型的复数名称接口设计录音文件入库、文本结果处理等任务过程中用到的各种接口。# 防止重复入库的接口 class CheckRecordingFile(APIView): def post(self, request): # 获取file_name参数 file_name = request.data.get('file_name') if not file_name: return Response({"error": "file_name is required"}, status=status.HTTP_400_BAD_REQUEST) # 查询CallRecord中是否有这个file_name record_exists = CallRecord.objects.filter(recording_file=file_name).exists() # 根据查询结果返回True或False if record_exists: return Response({"exists": True}, status=status.HTTP_200_OK) else: return Response({"exists": False}, status=status.HTTP_200_OK) #录音在线播放用到的接口 class AudioList(APIView): def get(self, request): mediaList = [] # 获取URL查询字符串中的rid参数 rid = request.query_params.get('rid') cid = request.query_params.get('cid') if rid: mediaList = CallRecord.objects.filter(id=rid) if cid: contact = Contact.objects.get(id=cid) mediaList = CallRecord.objects.filter(phone_number=contact) arr = [] #倒序 for item in mediaList[::-1]: # 随机1-10专辑封面图片 sui_num = random.randint(1, 10) #构建 arr.append({ 'id': item.id, 'title': f"{item.record_result.id} - {item.phone_number.number} - {item.call_time}", 'singer': f"{item.phone_number.name}", 'songUrl': f"{settings.MEDIA_URL}{urllib.parse.quote(item.recording_file)}", 'imageUrl': '/static/images/' + str(sui_num) + '.png', }) return Response({'list': arr}, status=status.HTTP_201_CREATED)录音文件同步手机中的通讯录音会自动传输到家庭nfs,管理系统会单独启动一个循环任务去nfs拉取音频文件入库并创建音频转文字任务。import subprocess import time from datetime import datetime # 定义需要执行的命令 commands = [ "mkdir -p /tmp/lxnfs", "mount -t smbfs //189xxxxx805:zhixxxx6@192.168.1.150/7460088 /tmp/lxnfs", "cp -n /tmp/lxnfs/来自ADT-AN00的手机备份/文件夹备份/* /Users/xinei/project/audioman/data/files/ || true", "umount /tmp/lxnfs" ] # 定义一个函数来执行这些命令 def run_commands(): for command in commands: try: # 执行每条命令 subprocess.run(command, shell=True, check=True) print(f"执行成功: {command}") except subprocess.CalledProcessError as e: print(f"命令执行失败: {command}\n错误信息: {e}") # 主循环,每小时检查一次时间 while True: current_time = datetime.now() # 只在 20:00 到 24:00 之间执行命令 if current_time.hour >= 20 and current_time.hour < 23: print(f"当前时间: {current_time}. 在允许的时间范围内,执行命令。") run_commands() else: print(f"当前时间: {current_time}. 不在允许的时间范围内,跳过执行。") # 等待 1 小时再检查时间 time.sleep(3600)录音文件转文字录音文件写入数据库后,默认状态为待处理。另一个脚本会自动扫描未处理的记录,然后自动创建处理任务。# 监控指定目录 def monitor_directory(path): observer = None event_handler = MyEventHandler() try: while True: current_time = datetime.now() # 只在20:00到24:00之间执行监控 if current_time.hour >= 20 and current_time.hour < 24: if observer is None: # 只有在 observer 没有启动时才创建新的观察者 observer = Observer() observer.schedule(event_handler, path, recursive=False) observer.start() print(f"当前时间: {current_time}. 启动监控。") else: if observer is not None: observer.stop() observer.join() # 等待线程停止 observer = None # 将 observer 置为 None,以便后续创建新的实例 print(f"当前时间: {current_time}. 停止监控。") time.sleep(3600) # 每小时检查一次时间 time.sleep(600) # 每次监控状态保持10分钟,然后再循环检查 except KeyboardInterrupt: if observer is not None: observer.stop() observer.join() if __name__ == "__main__": directory_to_watch = "/files/" # 替换为你要监控的目录 monitor_directory(directory_to_watch)可视化过程可视化通过grafana实现。直接链接mysql数据库,通过sql查询数据并返回,具体页面如开头所示。完整项目代码获取【统计分析】基于Django开发的录音管理系统源码
 -
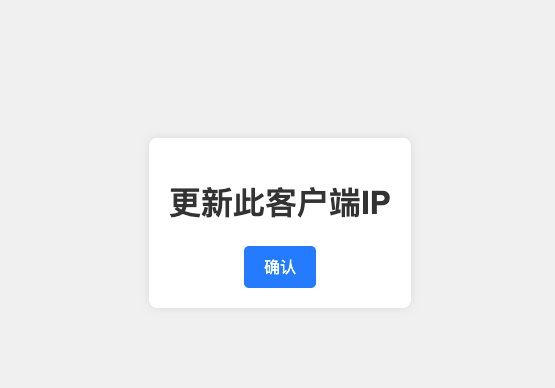
 新客户端IP一键过白功能开发与配置 前言部署了一个自己使用的web服务,不想对公网开放。最初用iptables对自己当前的电脑IP开放,禁止其他IP访问。每次路由器重启,或者在外出差,IP经常变动。需要登录服务器,新增新的IP。决定改变控制方式,利用nginx的IP白名单功能,同时用flask写了一个对公网开放的页面。当地址变动时,访问此页面。点击一键更新,就把最新的ip加入到nginx的白名单。同时重新加载nginx配置生效。{card-default label="ip更新页面" width="85%"}{/card-default}被控制服务需要进行ip访问控制,不对公网开放的nginx配置信息。default.conf配置用加载了ip白名单文件whitelist.conf# Appadmin server { listen 80; server_name 0.0.0.0; root /www/web/maccms_v10/; server_tokens off; #include none.conf; index index.php index.html index.htm; access_log /www/web_logs/wp_access.log wwwlogs; error_log /www/web_logs/wp_error.log notice; #auth_basic "请输入用户和密码"; # 验证时的提示信息 #auth_basic_user_file /etc/nginx/password; # 认证文件 location /{ include whitelist.conf; #默认位置路径为/etc/nginx/ 下, #如直接写include whitelist.conf,则只需要在/etc/nginx目录下创建whitelist.conf deny all; } location ~ \.php$ { fastcgi_pass php:9000; fastcgi_index index.php; include fcgi.conf; } #需要注意伪静态的配置 if (!-e $request_filename) { rewrite ^/index.php(.*)$ /index.php?s=$1 last; rewrite ^/api.php(.*)$ /api.php?s=$1 last; rewrite ^/adm0.php(.*)$ /adm0.php?s=$1 last; rewrite ^(.*)$ /index.php?s=$1 last; break; } location ~ .*\.(gif|jpg|jpeg|png|bmp|swf)$ { expires 30d; } location ~ .*\.(js|css)?$ { expires 12h; } }whitelist.conf文件内存放需要开放的IP,文件内容:allow 101.31.158.153;控制服务文章开头的一键放通页面用flask框架实现, 单独部署app.py主要实现逻辑,有两个接口。一个接口提供页面,一个接口负责获取IP后更新,同时重新加载被控制服务的nginx配置隐藏内容,请前往内页查看详情index.html提供文章开头的一键更新功能的页面代码<!DOCTYPE html> <html lang="en"> <head> <meta charset="UTF-8"> <meta name="viewport" content="width=device-width, initial-scale=1.0"> <title>IP 过白</title> <link rel="stylesheet" href="styles.css"> <!-- Link to external CSS file --> <script src="https://code.jquery.com/jquery-3.6.0.min.js"></script> <style> body { font-family: Arial, sans-serif; display: flex; justify-content: center; align-items: center; height: 100vh; background-color: #f0f0f0; margin: 0; } .container { text-align: center; background-color: #fff; padding: 20px; border-radius: 8px; box-shadow: 0 0 10px rgba(0, 0, 0, 0.1); } h1 { color: #333; } #uploadBtn { background-color: #007bff; color: #fff; border: none; padding: 10px 20px; border-radius: 5px; cursor: pointer; font-size: 16px; transition: background-color 0.3s ease; } #uploadBtn:hover { background-color: #0056b3; } #uploadBtn:focus { outline: none; } </style> </head> <body> <div class="container"> <h1>更新此客户端IP</h1> <button id="uploadBtn">确认</button> </div> <script> $(document).ready(function() { $('#uploadBtn').click(function() { $.ajax({ type: 'POST', url: '/upload_ip', success: function(response) { if (response.status === 'success') { alert('IP 更新成功: ' + response.ip); ('Error: ' + response.message); } }, error: function() { alert('发生错误.'); } }); }); }); </script> </body> </html>服务启动控制服务通过systemd加载,配置文件为:/etc/systemd/system/ipallow.service。配置内容为[Unit] Description=IpAllow App [Service] User=root WorkingDirectory=/opt/ipallow ExecStart=/usr/local/bin/gunicorn -w 2 -b 0.0.0.0:801 app:app Restart=always [Install] WantedBy=multi-user.targetcaddy代理控制服务启动了服务器的801端口,通道caddy2代理到443,然后通过公网可访问。不用nginx代理的原因是控制服务会重启nginx,导致前端页面在等待返回结构时异常。b.test.xyz:443 { tls service@test.xyz encode gzip log { output file /logs/access.log } header / { Strict-Transport-Security "max-age=31536000;includeSubdomains;preload" } #访问认证 basicauth / { cms $2a$14$bNLxxxxxxxxxxxxxxxxxxxxxxGAbzyOUyoBn1rjfpN/O } ## HTTP 代理配置 reverse_proxy http://192.168.0.203:801 { header_up X-Real-IP {http.request.remote.host} header_up X-Forwarded-For {http.request.remote.host} header_up X-Forwarded-Port {http.request.port} header_up X-Forwarded-Proto {http.request.scheme} } }caddy认证密码生产caddy的认证密码caddy hash-password --plaintext 'cmsxxxx'
 -

-

-

-

-

-

-

-


